
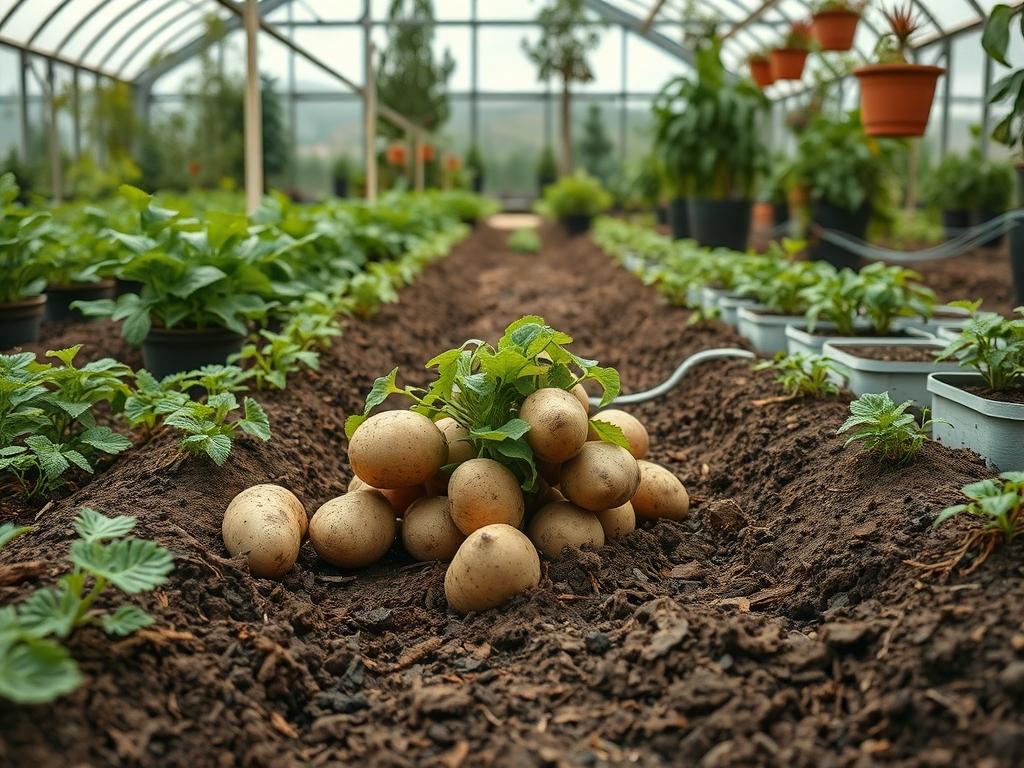
Integrating functional edible zones into a professional landscape design requires a sophisticated balance between aesthetic appeal and seasonal utility. For the modern estate owner or intensive gardener, the process of digging maincrop potatoes is more than a simple harvest; it is a critical stage in the annual lifecycle of an outdoor environment. Successfully managing this transition ensures that the landscape remains productive without sacrificing the visual integrity of the garden beds. Maincrop varieties, which occupy the ground for a duration of eighteen to twenty-two weeks, demand a strategic approach to extraction to prevent structural damage to the surrounding soil and to ensure the longevity of the produce. When planning the layout of these beds, a landscape architect must consider the physical footprint of the harvest process, ensuring that irrigation lines and nearby perennial borders are protected during the heavy lifting phases of late summer and autumn.
Functional outdoor design often centers on the concept of “The Working View,” where the utility of a vegetable plot is elevated through clean lines and high-quality materials. Digging maincrop potatoes involves significant soil disturbance, which can temporarily disrupt the symmetry of a garden. To mitigate this, a consultant must plan for post-harvest transition plantings or cover crops that restore green cover quickly. Furthermore, the timing of the harvest is influenced heavily by local microclimates and soil drainage patterns. In areas with heavy clay, for example, the architectural plan must include significant soil amendments to prevent the tubers from rotting before they reach the curing stage. A successful harvest is ultimately a testament to the site’s grading and drainage efficiency, as standing water is the primary enemy of long-term storage quality.
Landscape Design Principles
In the context of the edible landscape, symmetry and focal points define the difference between a cluttered patch and a professional kitchen garden. When designing zones intended for root crops, one should utilize elevation layers to delineate the potato beds from permanent walkways. Raised beds, constructed from Cedar or Stone Masonry, provide a clear boundary that prevents soil compaction from foot traffic. This is essential during the harvest because the laborer requires a stable, non-compacted area to stand while levering the soil. Focal points, such as a Central Obelisk or a Decorative Water Feature, can draw the eye away from the temporary disruption of the soil during the digging process.
Visual balance is achieved by flanking the potato rows with lower-maintenance, structurally consistent plants like Boxwood or Lavender. These edges hide the yellowing foliage of the maincrop potatoes as they reach maturity, a period known as “senescence.” Irrigation planning is equally vital; a professional design should incorporate subsurface drip lines that can be easily pulled back during the harvest to avoid damage from a Garden Fork or Spade. By installing walkways with a minimum width of 36 inches, the architect ensures there is ample room for wheelbarrows and harvesting crates, maintaining the flow of the outdoor space during intensive labor periods.
Plant and Material Selection
| Plant Type | Sun Exposure | Soil Needs | Water Demand | Growth Speed | Maintenance Level |
| :— | :— | :— | :— | :— | :— |
| Maris Piper (Potato) | Full Sun | Loose, Loamy | Moderate | Slow-Medium | High |
| King Edward (Potato) | Full Sun | Rich, Organic | Moderate | Slow | High |
| Desiree (Potato) | Full Sun | Drought Tolerant | Low-Medium | Medium | Moderate |
| Wood Chips (Mulch) | N/A | Weed Suppressant | N/A | N/A | Low |
| River Rock (Edging) | N/A | Drainage Layer | N/A | N/A | Very Low |
| Cover Crop (Clover) | Partial-Full | Nitrogen Fixer | Low | Fast | Low |
Implementation Strategy
The successful execution of digging maincrop potatoes begins with the preparation of the site long before the first shovel enters the ground. A professional layout utilizes precise grading to ensure that the beds sit slightly higher than the surrounding paths, encouraging optimal drainage. When the foliage has completely died back, usually after the first light frost, the tubers must remain in the ground for an additional 10 to 14 days. This waiting period is known as “curing in situ,” and it allows the skins to toughen, which is essential for preventing bruises during the harvest.
To begin the harvest, start at the outer perimeter of the bed and work inward. Use a Stainless Steel Garden Fork rather than a shovel; the tines of a fork are less likely to slice through the tubers hidden beneath the surface. Insert the tool approximately 12 inches away from the center of the plant to avoid the main cluster of potatoes. Lever the soil upward with a slow, steady motion, allowing the earth to crumble away from the root ball. In a well-designed landscape, this soil should be friable and rich in organic matter, making the separation process effortless. Once lifted, the potatoes should be left on the surface for no more than 2 to 3 hours to dry, especially if the sun is intense, as excessive UV exposure can cause greening and the development of toxic solanine.
After the initial drying phase, the potatoes should be moved to a transitional storage area. This location should be shaded, well-ventilated, and protected from pests. A professional landscape often includes a dedicated potting shed or a ventilated “harvest room” for this purpose. The temperature should be maintained between 55 and 60 degrees Fahrenheit for the first two weeks of storage to facilitate the final curing of any minor nicks or scratches.
Common Landscaping Failures
One of the most frequent errors in garden layout is improper drainage design, leading to anaerobic soil conditions. When digging maincrop potatoes, if the soil is overly saturated, the tubers will often be plagued by “lenticel enlargement,” which manifests as small white bumps on the skin. This not only ruins the aesthetic quality of the harvest but also creates entry points for pathogens. Furthermore, root overcrowding occurs when a gardener fails to observe the recommended spacing of 12 to 15 inches between plants. This competition for nutrients results in smaller, irregularly shaped tubers that are difficult to harvest without damage.
Soil compaction is another significant failure, often caused by the lack of designated walkways. If laborers are forced to step directly onto the growing beds, the soil structure is crushed, making the harvest physically demanding and increasing the likelihood of “clodding,” where large chunks of earth stick to the potatoes. Finally, irrigation inefficiencies, such as overhead sprinkling late in the season, can lead to late blight. A professional landscape consultant avoids this by utilizing timed drip systems that deliver water directly to the root zone, keeping the foliage dry and healthy until the very end of the season.
Seasonal Maintenance
Landscape management is a year-round commitment that changes with the cycles of the potato crop. In the spring, the focus is on soil preparation and the installation of organic matter. This involves tilling in 3 to 4 inches of well-rotted compost and ensuring that the irrigation lines are pressurized and clear of winter debris. As the summer progresses, maintenance shifts to hilling, where soil or mulch is pulled up around the base of the plants to protect the developing tubers from light.
Autumn is the primary season for digging maincrop potatoes and subsequent soil restoration. Once the beds are cleared, it is imperative to level the grade and apply a layer of Winter Mulch or plant a cover crop to prevent erosion. During the winter months, the landscape architect focuses on the infrastructure of the garden. This is the ideal time to repair retaining walls, sharpen tools like the Garden Fork, and plan the crop rotation for the following year. Rotating the potato plot to a different zone every three years is a fundamental principle of landscape health, as it prevents the buildup of soil-borne diseases and maintains the chemical balance of the earth.
Professional Landscaping FAQ
How do I know the potatoes are ready for long storage?
The foliage must be completely dead and brittle. Leave the tubers in the soil for two weeks post-dieback to ensure the skin has sufficiently thickened. This process, called suberization, is vital for resisting rot during the winter months.
What is the best tool for harvesting without damage?
A Border Fork with flat tines is the preferred instrument for landscape professionals. It allows for better soil aeration and minimizes the risk of piercing the tubers compared to a traditional pointed spade or a mechanical harvester.
Can I wash the potatoes before storing them?
Never wash potatoes intended for long-term storage. Moisture encourages fungal growth and bacterial rot. Instead, use a soft Natural Bristle Brush or a gloved hand to gently remove dry clumps of soil once the tubers have cured for several days.
What temperature is optimal for the permanent storage area?
For long-term preservation, aim for a consistent temperature of 40 to 45 degrees Fahrenheit. The environment must be dark to prevent sprouting and greening. High humidity, around 90 percent, helps prevent the tubers from shriveling over time.
How should I manage the landscape bed after the harvest?
Immediately smooth the soil to maintain the site’s grading. Incorporate a light layer of Compost and seed a nitrogen-fixing cover crop. This prevents soil erosion and ensures the bed remains an attractive, green component of the overall landscape design.