
Integrating edible crops like French shallots into a residential landscape requires a delicate balance between utility and aesthetics. While the harvest represents the culmination of a growing season, the transition from active growth to curing can often disrupt the visual harmony of a property. A well designed potager garden ensures that Harvesting Garden Shallots does not leave a void in the curb appeal or functional flow of the outdoor space. Landscape architects must consider the timing of the harvest alongside the seasonal succession of neighboring perennials to maintain a cohesive environment. Proper planning during the design phase allows the property owner to transition from the lush greens of late spring to the organized, tidy appearance required for successful curing and storage without compromising the site’s overall sophistication.
Environmental design plays a pivotal role in the success of the crop and the longevity of the soil. In regions with high humidity, the curing process must be internalized or shielded to prevent fungal infections, which can detract from the garden’s professional appearance. From a consultative perspective, we view the harvest not as the end of a cycle, but as a transitional phase that prepares the soil for autumn plantings. By utilizing professional grading techniques and structured garden beds, homeowners can ensure that the process of Harvesting Garden Shallots is efficient, clean, and architecturally sound. This approach transforms a simple gardening task into a strategic component of sustainable outdoor management.
Landscape Design Principles
Symmetry and structure are the foundations of a successful edible landscape. When planning for shallots, we often utilize raised beds measuring 4 feet by 8 feet, which provide controlled drainage and ease of access. These beds act as focal points within the garden hierarchy, often bordered by structural elements such as boxwood hedges or custom cedar edging. The symmetry of the Rows allows for precise irrigation planning, ensuring that water is delivered directly to the root zone without saturating the foliage. This architectural arrangement helps prevent the disorganized look often associated with vegetable patches, maintaining a high level of curb appeal even as the crop matures and the foliage begins to brown.
Elevation layers are equally important for both visual interest and practical functionality. We recommend planting shallots in the mid-layer of a tiered garden system. By placing lower-growing herbs like thyme or oregano along the front edge and taller structural plants like lavender or rosemary behind, the shallots are framed within a professional composition. This layering hides the drying foliage during the final weeks before Harvesting Garden Shallots, keeping the garden looking intentional. Furthermore, integrated flagstone walkways between these beds prevent soil compaction, allowing the gardener to maneuver during the harvest without damaging the root structures of neighboring ornamental species.
Plant and Material Selection
The following table outlines the species and materials recommended for a high-performance garden layout that supports shallots and their companion plantings.
| Plant Type | Sun Exposure | Soil Needs | Water Demand | Growth Speed | Maintenance |
| :— | :— | :— | :— | :— | :— |
| Shallots (Allium) | Full Sun | Sandy Loam | Moderate | Slow | Medium |
| Rosemary (Officinalis) | Full Sun | Well-Drained | Low | Moderate | Low |
| English Lavender | Full Sun | Gritty/Alkaline | Low | Slow | Low |
| Creeping Thyme | Full to Part Sun | Average | Low | Fast | Very Low |
| Cedar Mulch | N/A | Weed Barrier | N/A | N/A | Seasonal |
| Drip Irrigation | N/A | Efficiency | High | N/A | Annual |
Implementation Strategy
A successful implementation starts with meticulous site preparation. Before the first bulb is planted, the site must be graded to a 2 percent slope to ensure that water moves away from the bulb base, preventing rot. For backyard layouts, we recommend installing a sub-surface drainage system if your soil contains a high clay content. Once the infrastructure is in place, define the garden borders with steel edging or limestone retaining walls. These hardscaping elements create a permanent footprint that maintains the garden’s shape throughout the seasons.
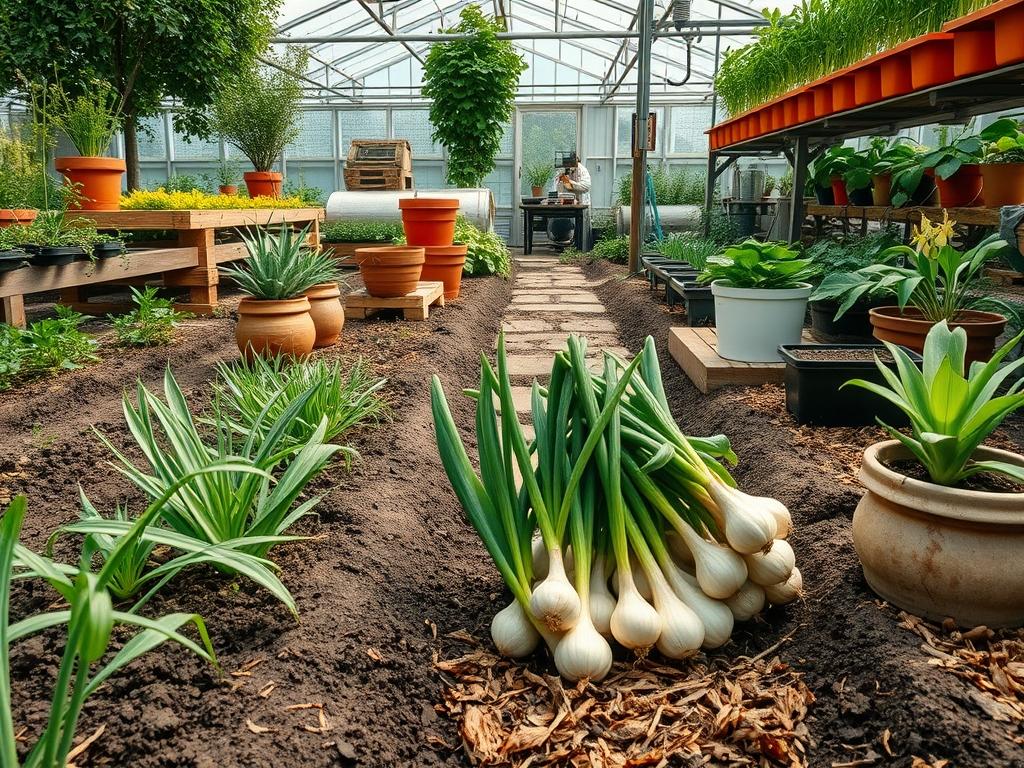
When the time arrives for Harvesting Garden Shallots, typically in mid-summer when the tops have turned brown and fallen over, the strategy shifts to curing. Do not pull the bulbs by their stems. Instead, use a garden fork to gently lift the soil from beneath the bulbs. This protects the basal plate and the delicate skins. For the curing phase, avoid leaving the crop on the bare soil, which can introduce moisture and pathogens. Instead, utilize ventilated drying racks positioned in a shaded, well-ventilated area such as a screened porch or a dedicated potting shed. This keeps the harvest out of the primary sightlines of the landscape, preserving the property’s aesthetic value while the bulb skins toughen for long term storage.
Common Landscaping Failures
The most frequent mistake in edible landscaping is poor drainage planning. Shallots are highly susceptible to bulb rot if they sit in standing water. Professionals often see failures where a garden was installed in a low-lying area without corrective grading. Soil compaction is another significant issue. If a landscape does not include dedicated walkways, foot traffic near the planting zone compresses the earth, restricts oxygen to the roots, and makes Harvesting Garden Shallots a difficult task that likely ends in bruised or damaged produce.
Improper spacing and air circulation also lead to systemic failures. Planting shallots too close to high-density shrubs can create microclimates of stagnant air, encouraging mildew and pests. Furthermore, many homeowners fail to adjust their irrigation systems as the crop reaches maturity. Watering should be tapered off entirely two weeks before the harvest to allow the bulbs to begin the drying process naturally in the ground. Over-watering during this final stage is a primary cause of storage failure, as the extra moisture prevents the outer layers from curing into a protective paper shell.
Seasonal Maintenance
Spring maintenance focuses on soil preparation and moisture management. We suggest incorporating 1 inch of organic compost into the top layers of the soil before planting. Ensure your drip irrigation lines are checked for clogs and positioned roughly 3 inches from the plant base. This ensures consistent growth without saturating the bulb. During the summer months, keep the area free of weeds that compete for nutrients. As the foliage begins to yellow, resist the urge to trim it, as those nutrients are being pulled back into the bulb for final development.
Autumn is the season for soil transition and storage monitoring. After Harvesting Garden Shallots and completing the curing process, the bulbs should be moved to a cool, dark location with a temperature range of 35 to 45 degrees Fahrenheit. In the garden, this is the time to apply a 3 inch layer of mulch to the empty beds to prevent erosion and suppress winter weeds. Winter maintenance is primarily focused on inspection. Periodically check your stored shallots for any signs of softening or sprouting, and remove affected bulbs immediately. In the landscape, winter is the ideal time to plan for crop rotation, ensuring that the next season’s Alliums are placed in a different quadrant to maintain soil health and interrupt pest cycles.
Professional Landscaping FAQ
How do I know the shallots are ready for harvest?
Look for the foliage to lose its turgidity and turn brown. When approximately half of the leaves have fallen over, the bulbs have reached maturity. This structural shift indicates that the plant has finished its active growth cycle.
Can I cure shallots directly in the sun?
Direct sunlight can cause sunscald on the delicate outer skins of the bulbs. It is best to cure them in a shaded, airy location. This ensures the skins dry evenly without damaging the interior flesh of the crop.
What is the best mulch for an edible landscape?
Use a clean, organic material like pine bark or straw. These materials provide excellent moisture retention and weed suppression without altering the soil pH significantly. Avoid dyed mulches, which can contain chemicals unsuitable for a food-producing environment.
How does drainage affect storage life?
Poor drainage during the growing season leads to high internal moisture content. Bulbs grown in professional, well-drained sandy loam have a tighter cellular structure, which reflects in a much longer shelf life and better resistance to rot during winter storage.
Why is grading important for shallot beds?
Grading prevents water from pooling around the crown of the plant. Since shallots are often grown as a long-term crop, preventing any standing water is essential for maintaining both plant health and the structural integrity of your retaining walls and borders.